Most advice on internal linking sounds great in theory. Add relevant links. Use descriptive anchor text. Connect related pages. Sure. But when you're staring at a draft wondering where exactly those links should go, theory doesn't help much.
What actually moves the needle is a repeatable system—a structure you can drop into every post without overthinking it.
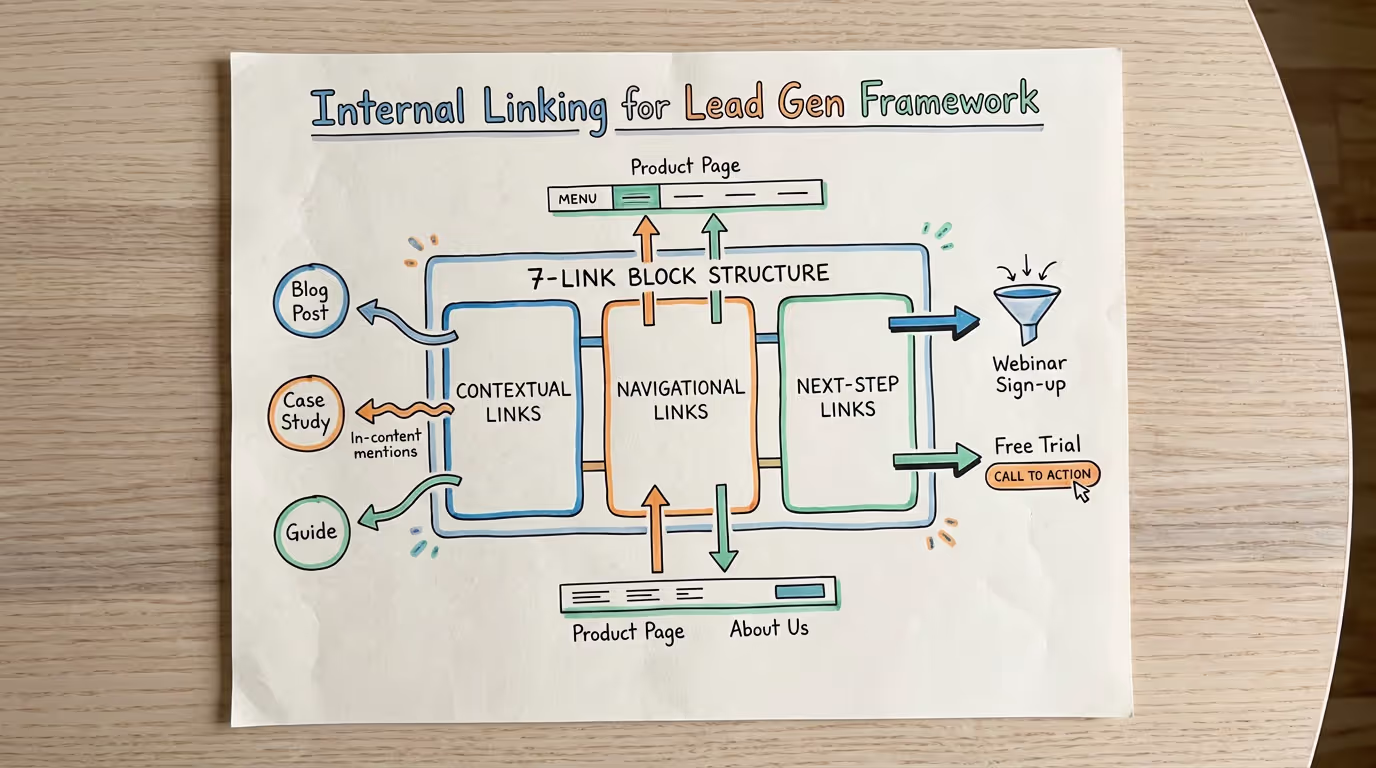
That's where the 7-link block comes in. It's a standardized internal linking framework designed specifically for lead generation. Not just SEO housekeeping. Not just "best practices." A deliberate architecture that guides readers from awareness to action.
Internal linking for lead gen isn't about cramming hyperlinks into paragraphs and hoping for the best. It's about building a path. The 7-link block gives you that path, post after post.
Why Most Internal Linking Advice Falls Flat
Here's the problem with typical internal linking guidance: it's all principles, no blueprint.
"Link to relevant content." Okay, but how many links? Where in the post?
"Use contextual anchor text." Fine, but what counts as contextual?
"Create topic clusters." Great concept. Zero implementation details.
The result? Inconsistent linking across your blog. Some posts have twelve internal links crammed into the introduction. Others have two buried in the footer. Your readers can't find what they need, and Google can't figure out what matters.
According to Moz, internal links help search engines understand site structure and distribute page authority across your domain [1]. But understanding why internal linking matters doesn't tell you how to execute it consistently.
The 7-link block solves this by giving you a plug-and-play template. Same structure, every post. No guesswork.
The 7-Link Block Framework Explained
The 7-link block divides your internal links into three categories:
Contextual links (3–4 links)
Navigational links (2 links)
Next-step links (1–2 links)
Each category serves a different purpose. Together, they create a complete reader journey within a single post.

Contextual Links: Build Depth and Authority
Contextual links connect your current post to related content on your site. These are the links that appear naturally within your body copy, pointing to blog posts, guides, or resources that expand on specific points.
How many: 3–4 per post
Where they go: Embedded in relevant paragraphs, ideally within the first 50% of your article
Purpose: Keep readers engaged, reduce bounce rate, demonstrate topical depth
For example, if you're writing about content marketing ROI, a contextual link might point to your post on measuring blog performance or your guide to content calendars.
The key is relevance. Each contextual link should feel like a helpful detour—not a speed bump. Google's Search Quality Evaluator Guidelines emphasize that helpful content should provide clear, accurate information that serves user intent [2].
Navigational Links: Orient the Reader
Navigational links help readers understand where they are on your site and what else you offer. These typically point to pillar pages, category pages, or cornerstone content.
How many: 2 per post
Where they go: Early in the post (often the introduction or first H2 section) and mid-article
Purpose: Establish site structure, connect posts to larger themes, improve crawlability
Think of navigational links as signposts. If your blog has a pillar page on SEO strategy, most posts in that topic cluster should link back to it. This tells both readers and search engines how your content fits together.
Ahrefs reports that internal linking helps distribute "link equity" across your site, meaning pages with more internal links pointing to them tend to rank better [3]. Navigational links are how you intentionally direct that equity.
Next-Step Links: Drive Action
This is where internal linking becomes a lead generation tool.
Next-step links point readers toward conversion pages: your pricing page, free trial signup, consultation booking, or lead magnet download. They appear at the end of your post (and sometimes mid-article if the context is right).
How many: 1–2 per post
Where they go: Conclusion section, and optionally within a relevant mid-article section
Purpose: Move readers from education to action
Most blogs skip this entirely—or bury it in a generic "learn more" link that goes nowhere useful. The 7-link block treats next-step links as essential, not optional.

How to Write Anchor Text That Actually Works
Anchor text is the clickable text in your hyperlink. It matters more than most people realize.
Vague anchor text like "click here" or "this article" tells readers (and Google) nothing about the destination page. Keyword-stuffed anchor text like "best internal linking SEO strategy for lead generation blogs" looks spammy and reads unnaturally.
The rule: Anchor text should be descriptive, natural, and specific.
Good examples:
"our guide to blog publishing frequency"
"how we structure topic clusters"
"the done-for-you content tier"
Bad examples:
"click here"
"read more"
"internal linking for lead gen SEO content marketing strategy"
Google's documentation on link best practices recommends using "descriptive anchor text" that gives users a clear idea of what they'll find on the linked page [4]. Keep it tight—2–6 words is usually ideal.
Also, vary your anchor text across posts. If ten different articles link to the same page with identical anchor text, it looks unnatural. Use variations that describe the same destination in slightly different ways.
Implementing the 7-Link Block: Step by Step
Here's how to apply the framework to your next blog post.
Step 1: Identify Your Link Destinations
Before writing (or during the editing phase), list out your internal link targets:
3–4 contextual targets: Related blog posts, guides, or resources
2 navigational targets: Pillar pages, category pages, or cornerstone content
1–2 next-step targets: Pricing page, free trial, consultation booking
If you're using a content management system, keep a running spreadsheet of your top link targets. This saves time and ensures consistency across your blog.
Step 2: Place Contextual Links First
As you review your draft, identify 3–4 places where a contextual link would genuinely help the reader. Ask yourself:
Does this paragraph reference a concept I've covered elsewhere?
Would a reader naturally want more detail on this point?
Does linking here make the sentence better, not just longer?
Insert contextual links where they fit naturally. Don't force them.
Step 3: Add Navigational Links Early
In your introduction or first major section, include at least one navigational link. This might be a reference to your broader approach ("Here's how we think about content strategy") or a pointer to a related pillar page.
Add a second navigational link somewhere in the middle of your post—often in a section that bridges two ideas or introduces a new subtopic.
Step 4: End with a Next-Step Link
Your conclusion should always include at least one link to a conversion page. This is where you invite the reader to take action.
Don't be shy about it. If your content is genuinely helpful, readers will want to know what you offer.
If you're writing about content marketing for SaaS companies, end with a link to your pricing options or an invitation to try the service free.
Step 5: Audit Your Link Balance
Before publishing, count your internal links:
3–4 contextual? ✓
2 navigational? ✓
1–2 next-step? ✓
If you're short in any category, go back and add links. If you're over by a lot, consider removing the weakest ones. The 7-link block is a framework, not a straitjacket—but staying close to the numbers keeps your posts consistent.
Common Mistakes to Avoid
Even with a clear framework, internal linking goes sideways when people ignore a few basic principles.
Mistake 1: Front-Loading All Your Links
Some writers dump all their internal links into the first two paragraphs. This overwhelms readers and makes the introduction feel like a Wikipedia disambiguation page.
Spread your links throughout the post. Contextual links especially should appear in the sections where they're most relevant—not all at once.
Mistake 2: Linking to Low-Value Pages
Not every page on your site deserves internal links. That outdated blog post from three years ago? Probably not your best link target.
Prioritize pages that are:
High-quality and up-to-date
Strategically important (conversion pages, pillar content)
Relevant to the post you're writing
Link equity is real. Use it intentionally.
Mistake 3: Forgetting Next-Step Links Entirely
This is the biggest missed opportunity. You've educated the reader, built trust, demonstrated expertise—and then you end with no clear path forward.
Every blog post should give readers an obvious next step. Without it, you're leaving pipeline on the table.
Mistake 4: Using the Same Anchor Text Everywhere
If every link to your pricing page says "see our pricing," Google might start to wonder if something fishy is going on.
Vary your anchor text. "Explore our content plans," "check out pricing options," and "see what a done-for-you blog engine costs" all point to the same place but look natural across different posts.

Why the 7-Link Block Works for Lead Gen
Internal linking isn't just about SEO—though it certainly helps there. For lead generation, the 7-link block creates a deliberate path through your site.
Contextual links keep readers engaged and exploring. Navigational links help them understand your broader expertise. Next-step links convert that interest into action.
HubSpot research indicates that companies with strong internal linking structures see better time-on-site metrics and improved conversion rates [5]. When readers can easily find related content and clear calls to action, they're more likely to become leads.
The 7-link block also makes your content production more efficient. Instead of reinventing your linking strategy for every post, you apply the same proven structure. This frees up mental energy for the work that actually matters: creating valuable content.
A Quick Reference: The 7-Link Block Checklist
Use this checklist for every blog post:
| Link Type | Quantity | Placement | Purpose |
| Contextual | 3–4 | Body paragraphs, first 50% of post | Deepen engagement, show topical authority |
| Navigational | 2 | Introduction + mid-article | Establish site structure, connect to pillars |
| Next-Step | 1–2 | Conclusion + optional mid-article | Drive conversions, move readers toward action |
Anchor text rules:
Descriptive and specific (2–6 words)
Natural-sounding, not keyword-stuffed
Varied across posts linking to the same destination
Print this. Tape it near your screen. Use it every time.

Build Your Internal Linking System
The 7-link block isn't complicated. That's the point. Complexity kills consistency, and consistency is what turns a blog into a lead generation engine.
Every post you publish with a solid internal linking structure makes your next post more powerful. Links compound. Authority compound. Pipeline compounds.
If you want a content team that installs these link blocks automatically—along with full SEO optimization, schema markup, and strategic internal linking—explore our done-for-you publishing tier. You focus on running your business. We handle the blog engine.
Ready to see it in action? Try the Mighty Quill free—two custom articles in 48 hours, no commitment.
Frequently Asked Questions
How many internal links should a blog post have?
A strong blog post typically includes 5–9 internal links, depending on length. The 7-link block framework recommends 3–4 contextual links, 2 navigational links, and 1–2 next-step links. This creates a balanced structure that serves both readers and search engines without overwhelming the content.
What makes internal linking effective for lead generation?
Internal linking for lead gen works by guiding readers through a deliberate journey—from educational content to conversion pages. Next-step links specifically point to pricing pages, free trials, or consultation bookings. Without these directional links, even great content stops short of generating pipeline.
Should I link to the same page multiple times in one post?
Generally, no. One link to each destination page per post is sufficient. Multiple links to the same page within a single article can look spammy and dilute the user experience. If a page is truly important, link to it once with strong anchor text rather than repeatedly.
How do I choose which pages to link to internally?
Prioritize pages that are high-quality, up-to-date, and strategically important. Conversion pages (pricing, free trial) should appear in next-step links. Pillar content and category pages work well for navigational links. Related blog posts and guides fit contextual linking. Avoid linking to outdated or low-value content.
Does internal linking actually improve SEO rankings?
Yes. Internal links help search engines discover and understand your site structure, distribute page authority, and determine which pages are most important. Both Google and independent SEO research confirm that strategic internal linking correlates with improved rankings and crawlability [1][3].
About The Mighty Quill
The Mighty Quill is an AI-powered blog engine built for growth-focused businesses. Founded by Mario, a digital marketing professional with over fifteen years of experience in SEO, content strategy, and e-commerce growth, the company delivers SEO-optimized blog content on a consistent publishing schedule. The done-for-you tier includes full internal linking optimization, schema markup, and strategic content planning—so your blog becomes a genuine organic traffic engine.
Works Cited
[1] Moz — "Internal Links." https://moz.com/learn/seo/internal-link
[2] Google — "Search Quality Evaluator Guidelines." https://developers.google.com/search/docs/fundamentals/creating-helpful-content
[3] Ahrefs — "Internal Links for SEO: An Actionable Guide." https://ahrefs.com/blog/internal-links-for-seo/
[4] Google Search Central — "Link Best Practices." https://developers.google.com/search/docs/crawling-indexing/links-crawlable
[5] HubSpot — "How to Create an Internal Linking Strategy." https://blog.hubspot.com/marketing/internal-linking-strategy