Publishing two to three SEO-optimized blog posts every week sounds ambitious. For most marketing teams, it feels like chaos waiting to happen—missed deadlines, half-finished drafts, internal links that go nowhere, schema that never gets implemented.
I've watched teams spend four hours perfecting a brief only to abandon the draft halfway through production. The problem isn't a lack of tools or talent. It's the absence of a system.
The right blog engine stack—stripped down to essential tools with clear inputs, outputs, and time budgets—transforms content production from a scramble into a repeatable process. This guide walks through each stage of that engine, specifying exactly what you need (and what you don't) to scale your content operations and publish high-quality blog posts week after week.
Why Most Content Operations Fail at Scale
The problem isn't usually the writing. It's everything around the writing.
Teams invest in expensive content calendars, then forget to update them. They draft posts but leave them sitting in review for weeks. They publish without internal links, skip schema markup, and wonder why organic traffic stays flat.
Research from the Content Marketing Institute consistently shows that fewer than one-third of B2B marketers rate their content marketing as highly successful [1]. The gap between intention and execution is where most content programs stall.
A blog publishing workflow solves this by creating clear handoffs, predictable time requirements, and quality checkpoints at every stage. Think of it like a manufacturing line for content—each station has defined inputs, outputs, and cycle times.

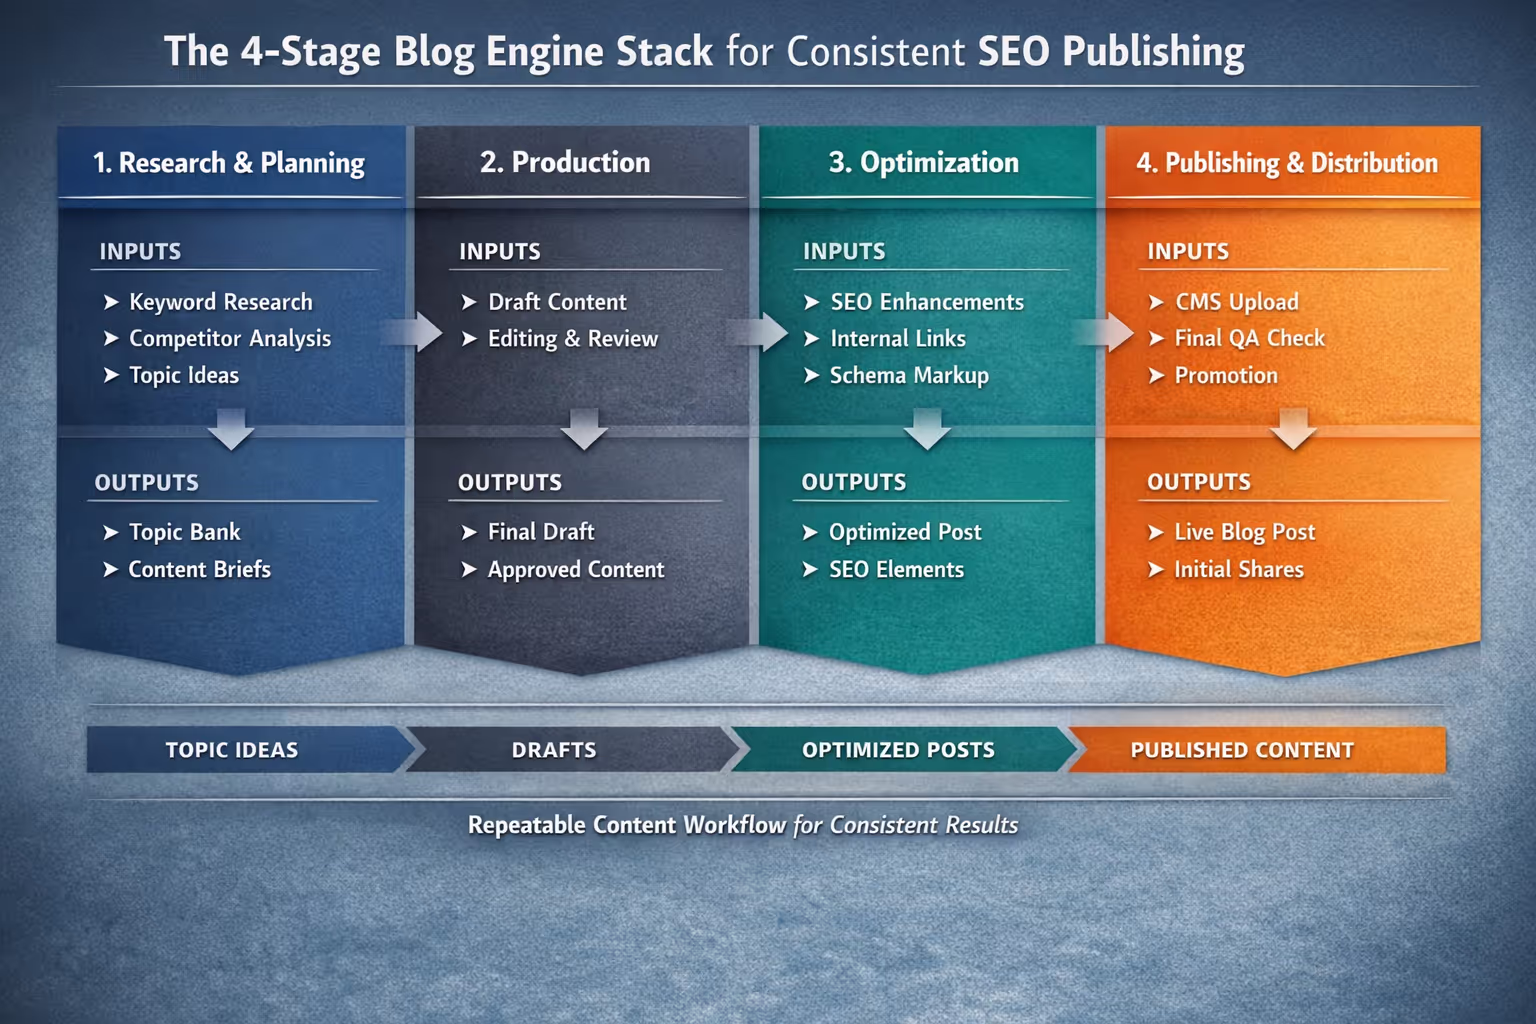
The Four Stages of a Blog Engine Stack
Every sustainable content operation moves through four stages:
Research & Planning — What topics? What keywords? What's the angle?
Production — Drafting, editing, and finalizing content
Optimization — Semantic SEO, internal links, schema, on-page elements
Publishing & Distribution — Final checks, going live, and initial promotion
[Insert diagram: The 4-Stage Blog Engine Stack showing inputs/outputs for each stage]
Stage 1: Research & Planning Engine
Purpose: Generate a steady pipeline of validated topics with clear SEO targets.
Inputs:
Business goals and target audience
Competitor content analysis
Keyword research data
Outputs:
Topic bank (20–30 validated topics)
Weekly content calendar
Brief for each assigned post
Minimal Tool Stack for Research
| Tool Type | Recommended Option | Alternative |
| Keyword Research | Ahrefs or Semrush | Ubersuggest, Keywords Everywhere |
| Topic Organization | Notion or Airtable | Google Sheets |
| Competitor Analysis | Ahrefs Content Explorer | Manual SERP review |
You don't need all of these. For teams operating on tight budgets, a combination of Ubersuggest (or even Google's free Keyword Planner) plus a well-organized spreadsheet can work. The goal is consistency, not complexity.
Here's an unpopular opinion: expensive keyword tools are often a trap for early-stage teams. I've seen companies spend $400/month on Semrush while publishing one blog post every six weeks. The tool isn't the bottleneck—the publishing cadence is.
Time Budget: Research & Planning
Initial topic bank creation: 3–4 hours (one-time setup)
Weekly topic selection and briefing: 1–1.5 hours per week
Keyword validation per post: 15–20 minutes
The research stage is where most teams over-invest time. A common mistake is spending hours perfecting a brief when 20 minutes of focused keyword validation would suffice. Perfect is the enemy of published.
Operating Cadence
Run your research session at the same time each week—ideally early in the week. Monday mornings work well for most teams. This creates a predictable rhythm: research Monday, draft Tuesday through Thursday, optimize and publish Friday.

Stage 2: Production Engine
Purpose: Transform briefs into draft-ready content efficiently.
Inputs:
Approved topic brief
Target keyword and search intent
Word count guidance
Outputs:
First draft
Edited final draft
Suggested images/media
Minimal Tool Stack for Production
| Tool Type | Recommended Option | Alternative |
| Writing Environment | Google Docs | Notion, Word |
| AI Drafting Assistance | Claude, ChatGPT | Jasper, Copy.ai |
| Grammar/Style Check | Grammarly | Hemingway Editor (free) |
| Plagiarism Check | Copyscape | Grammarly Premium |
AI writing tools have dramatically reduced the time required for first drafts. The key word is assistance—AI generates raw material that still requires human judgment, editing, and fact-checking. The best content teams use AI to overcome blank-page paralysis, then layer in expertise, brand voice, and genuine insight during editing [2].
Time Budget: Production
AI-assisted first draft: 30–45 minutes per post
Human editing and refinement: 45–60 minutes per post
Total per post: 1.5–2 hours
For 2–3 posts per week, budget 4–6 hours of production time. This is achievable for a single content marketer or a small team splitting responsibilities.
Quality Gate: Before Moving to Optimization
Before any draft moves to the next stage, verify:
[ ] Focus keyword appears in H1, first 100 words, at least one H2, and conclusion
[ ] Content directly addresses the search intent
[ ] All claims are accurate and verifiable
[ ] Tone matches brand voice guidelines
[ ] No placeholder text remains
Stage 3: Optimization Engine
Purpose: Transform a good draft into a search-ready asset with proper technical SEO elements, semantic coverage, and internal linking.
Inputs:
Approved final draft
Site's internal linking map
Schema requirements
Semantic keyword targets
Outputs:
Fully optimized post with internal links
Schema markup blocks
Meta title and description
Semantically complete content
This stage is where most teams cut corners—and where the compounding benefits of good SEO live.
Minimal Tool Stack for Optimization
| Tool Type | Recommended Option | Alternative |
| Semantic SEO | Surfer SEO, Clearscope | Frase, MarketMuse |
| On-Page SEO | Yoast, RankMath | Manual checklist |
| Internal Link Management | Link Whisper | Manual tracking spreadsheet |
| Schema Generator | Schema.org markup generator | Yoast/RankMath built-in |
| SERP Preview | Yoast SERP preview | Google SERP simulator (free) |
Semantic Optimization: The Missing Step
Most "SEO optimization" guides jump straight to meta tags and internal links. They skip the step that actually moves rankings: semantic completeness.
Semantic SEO means ensuring your content covers the related concepts, entities, and subtopics that search engines expect to see for your target keyword. Tools like Surfer SEO and Clearscope analyze top-ranking pages and identify the terms and topics your content should include.
A practical approach:
Run your draft through a semantic analysis tool (or manually review the top 5 ranking pages for your keyword)
Identify gaps — concepts competitors cover that you've missed
Add relevant sections or expand existing ones — naturally, not as keyword stuffing
Verify entity coverage — are you mentioning the key people, tools, or concepts in your space?
This step takes 15–20 minutes but significantly improves topical depth.
Internal Links: The Overlooked Multiplier
Internal linking does two things: it helps search engines understand your site structure, and it passes authority between pages. Internal links remain one of the most controllable ranking factors available to site owners [3].
Yet most teams treat internal linking as an afterthought—adding one or two links wherever convenient.
A systematic approach works better:
Maintain a linking map: A simple spreadsheet listing your top 10–20 priority pages (service pages, cornerstone content, high-converting posts)
Set a minimum: Every new post should include 2–3 internal links to relevant priority pages
Add contextual links: Link naturally within the content where the reference adds value for readers
Internal Link QA Checklist
Before publishing, verify:
[ ] Minimum 2–3 internal links included
[ ] At least one link points to a commercial/conversion page
[ ] Links use descriptive anchor text (not "click here")
[ ] No broken internal links
[ ] Links open in the same tab (standard for internal links)
[ ] Linked pages are relevant to the content context
Schema Markup: Essential Blocks
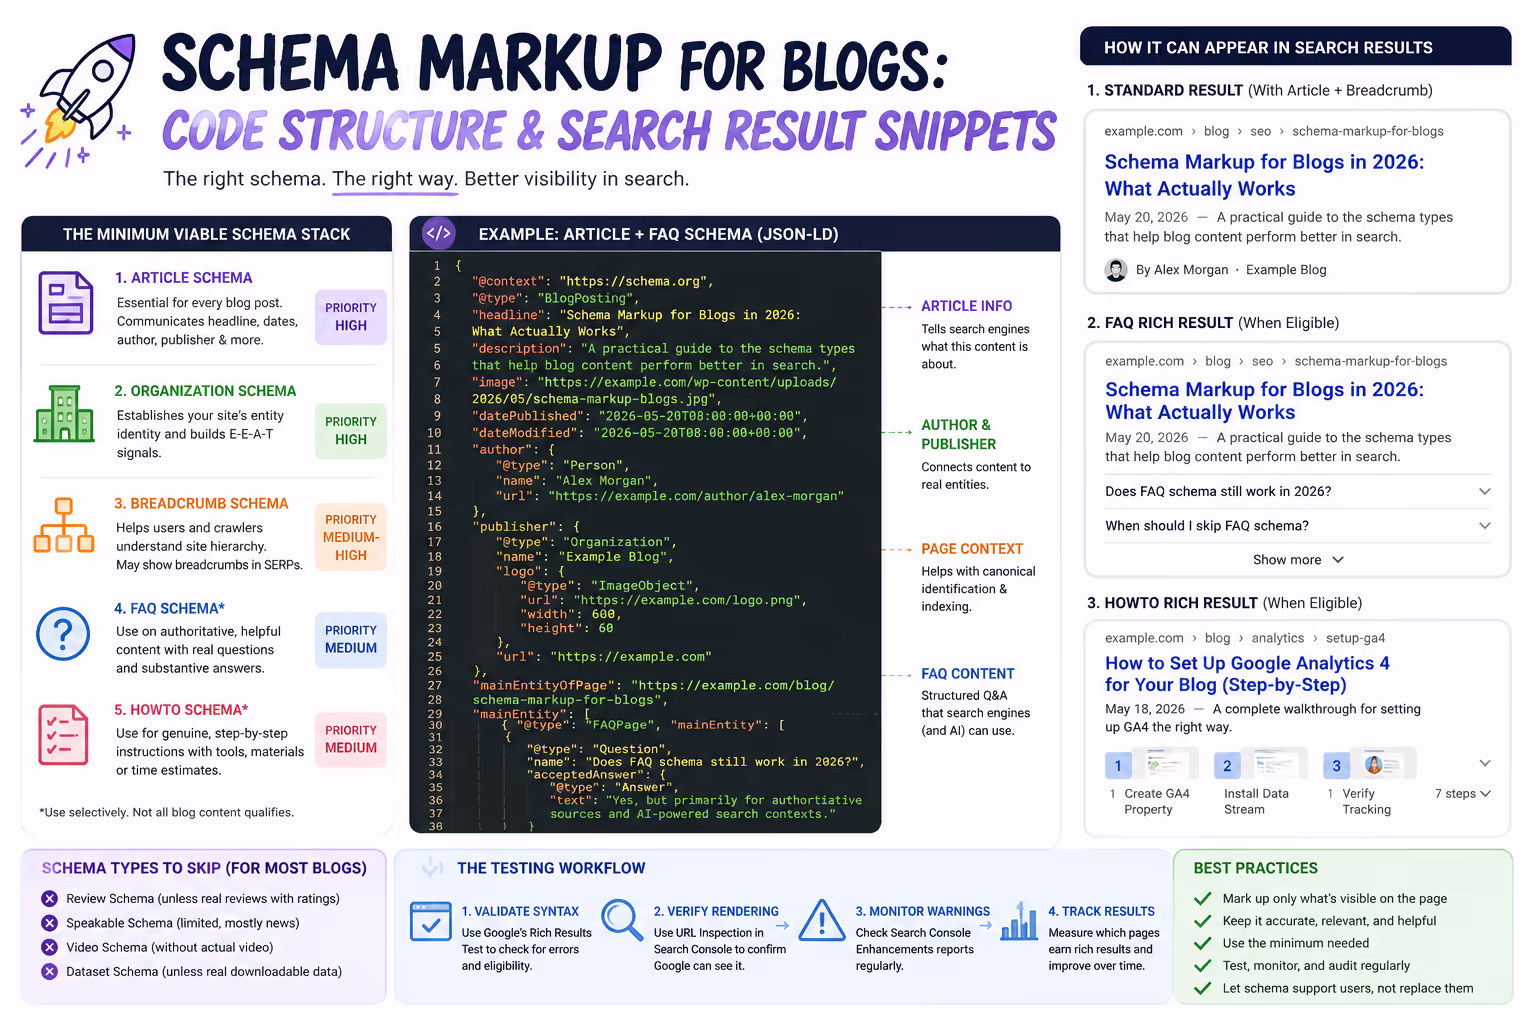
Schema markup helps search engines understand your content and can enable rich results in search. For blog content, three schema types matter most:
1. Article Schema
Most modern SEO plugins (Yoast, RankMath) generate Article schema automatically when you structure content correctly. If you're implementing manually, ensure you include headline, author, datePublished, and publisher fields.
Note: You don't need to write JSON-LD by hand if you use a good SEO plugin—these tools handle the code generation for you.
2. FAQ Schema (for posts with FAQ sections)
Add FAQ schema whenever your post includes a question-and-answer section. This can generate rich results in search, displaying your questions directly in the SERP.
3. HowTo Schema (for tutorial/process posts)
Use when content explains step-by-step procedures. HowTo schema can display steps directly in search results, increasing visibility.
Schema QA Checklist
[ ] Article schema includes accurate author and publication date
[ ] FAQ schema matches the actual FAQ section in content
[ ] Schema validates in Google's Rich Results Test [4]
[ ] No duplicate schema blocks
[ ] Publisher information is consistent across posts
Time Budget: Optimization
Semantic optimization: 15–20 minutes per post
Internal linking: 15–20 minutes per post
Schema implementation: 10–15 minutes per post
Meta optimization: 10 minutes per post
Total per post: 50–65 minutes
Stage 4: Publishing & Distribution Engine
Purpose: Final verification, consistent publishing cadence, and initial distribution.
Inputs:
Fully optimized post
Publishing schedule
QA checklist
Distribution channels
Outputs:
Live, indexed blog post
Confirmed technical implementation
Initial distribution complete
Minimal Tool Stack for Publishing
| Tool Type | Recommended Option | Alternative |
| CMS | WordPress | Webflow, Ghost, HubSpot |
| Scheduling | WordPress scheduler | CoSchedule, Buffer |
| Index Request | Google Search Console | Bing Webmaster Tools |
| Mobile Preview | Chrome DevTools | Responsively App (free) |
The Final QA Checklist
This is your last line of defense. Every post should pass these checks before going live:
Content Quality
[ ] Title tag is compelling and includes focus keyword
[ ] Meta description is 150–160 characters and actionable
[ ] Featured image is optimized (compressed, descriptive alt text)
[ ] No spelling or grammatical errors
[ ] All external links open in new tabs
[ ] Sources are properly cited
Technical SEO
[ ] URL is clean and includes focus keyword
[ ] Heading hierarchy is logical (one H1, multiple H2s, H3s as needed)
[ ] Images have descriptive file names
[ ] Page loads in under 3 seconds
[ ] Content displays correctly on mobile
Schema & Links
[ ] Schema validates without errors
[ ] Internal links function correctly
[ ] No 404 errors on any linked pages
Post-Publish: Initial Distribution
A blog engine doesn't end at "Publish." It ends at initial distribution. Within 24 hours of publishing:
[ ] Request indexing in Google Search Console
[ ] Share to primary social channel (LinkedIn for B2B, Twitter/X for broader reach)
[ ] Include in next email newsletter or dedicated send
[ ] Add post to internal linking opportunities for future content
[ ] Verify page appears correctly in SERP preview
This distribution step takes 10–15 minutes and ensures your content actually reaches an audience while waiting for organic traffic to compound.
Time Budget: Publishing & Distribution
Final QA and fixes: 15–20 minutes per post
Publishing and index request: 5–10 minutes per post
Initial distribution: 10–15 minutes per post
Total per post: 30–45 minutes
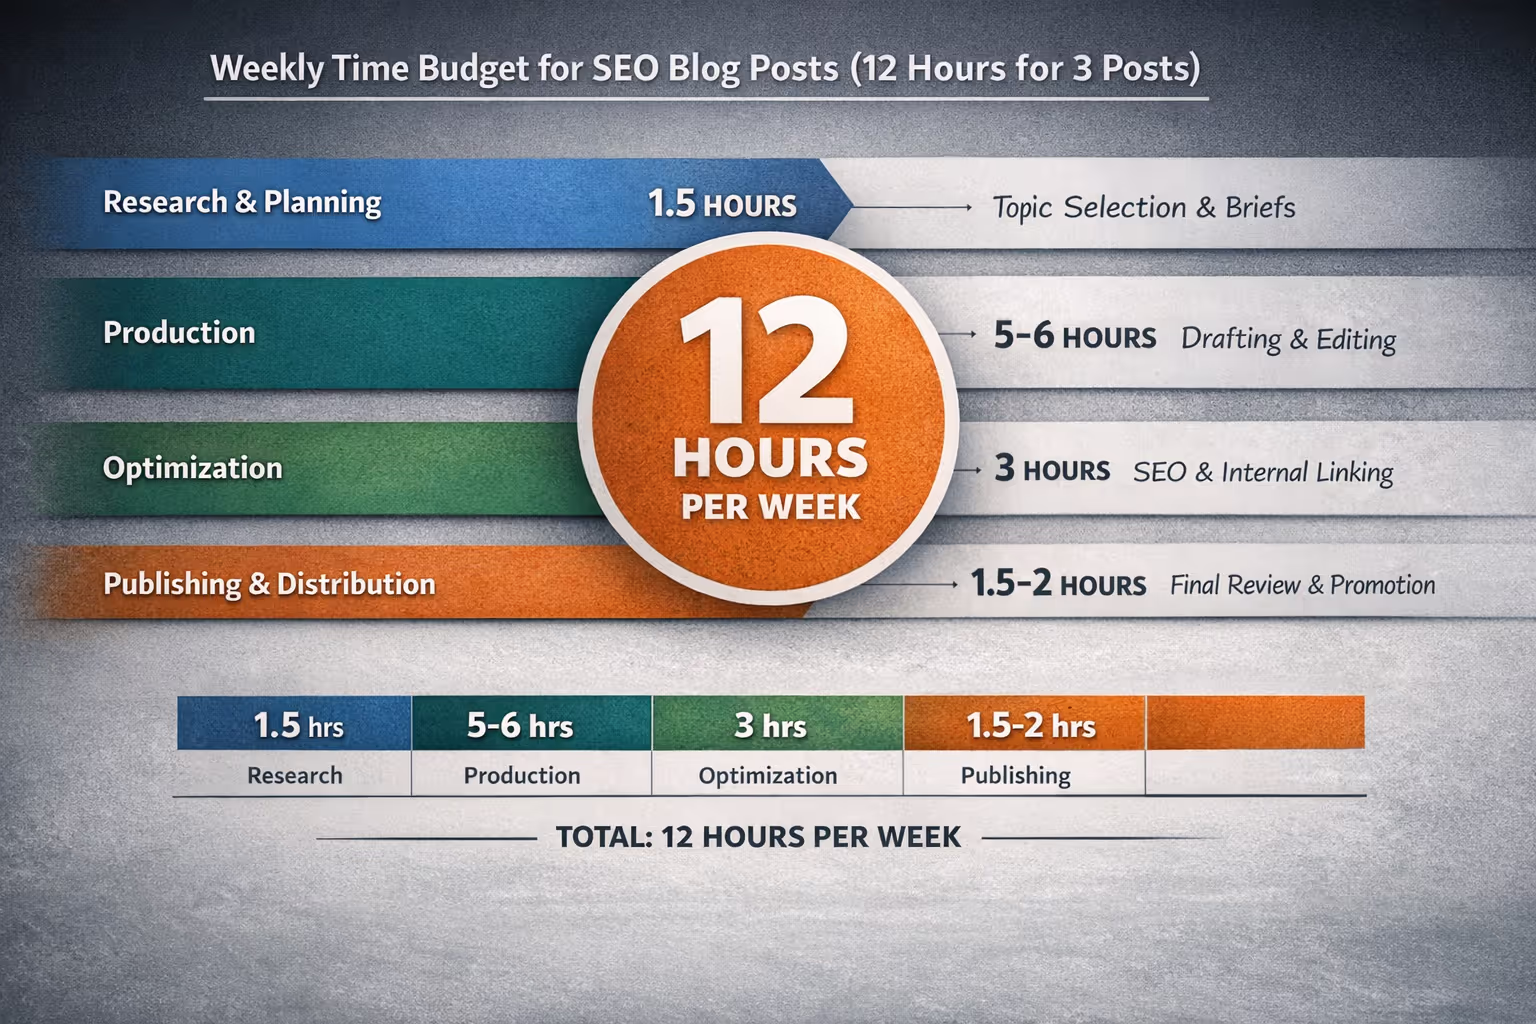
Total Time Budget: Scaling Content Operations at 2–3 Posts Per Week
Here's what the complete weekly time investment looks like:
| Stage | Time Per Post | Weekly Total (3 posts) |
| Research & Planning | 20 min | 1.5 hours |
| Production | 1.5–2 hours | 5–6 hours |
| Optimization | 50–65 min | 3 hours |
| Publishing & Distribution | 30–45 min | 1.5–2 hours |
| Total | ~3.5 hours | ~12 hours |
Twelve hours per week for three high-quality, SEO-optimized posts is achievable for a dedicated content marketer. It's also the point where many growing companies hit a wall—they have the strategy, but not the bandwidth to protect their team's limited hours.
[Insert infographic: Weekly Time Budget Breakdown by Stage]

When the Stack Isn't Enough: Removing the Highest-Friction Stage
The optimization and publishing stages are where most content operations break down. Not because they're complicated, but because they're tedious. They require attention to detail exactly when teams are mentally ready to move on to the next project.
This is why done-for-you publishing services exist. Outsourcing the final stages—semantic optimization, internal linking, schema implementation, technical QA, and actual publishing—removes the highest-friction work while keeping strategic control in-house.
For teams already stretched thin, this isn't about capability. It's about focus.
Building Your Stack: Start Minimal, Expand Deliberately
The best blog engine stack is the one you'll actually use. Start with the minimum viable setup:
Week 1–2: Establish your topic bank and content calendar (Google Sheets works fine)
Week 3–4: Implement a consistent production workflow with clear handoffs
Week 5–6: Add semantic optimization, internal linking, and schema checklists to your QA process
Week 7–8: Implement distribution workflows and measure initial results
Week 9+: Evaluate where time is being lost and consider tool upgrades or outsourcing
Resist the urge to add tools before you've validated the process. A sophisticated tool stack with inconsistent execution loses to a simple stack with disciplined cadence every time.
The Compounding Effect of Consistency
Publishing 2–3 SEO-optimized posts per week adds up. After six months, you have 50–75 pieces of search-indexed content working around the clock. After a year, you're approaching 150 posts—a genuine content asset that compounds organic traffic over time.
Most sites see measurable traffic improvements within three to six months of consistent publishing, though this varies by competition and domain authority. The compounding effect accelerates over time—month six to twelve typically shows stronger growth than month one to six.
The stack exists to make that consistency sustainable. Not heroic. Not exhausting. Just a system that runs.
Ready to build your blog engine but want the publishing headaches handled for you? The Mighty Quill's done-for-you publishing plan takes care of optimization, internal linking, schema, and technical QA—so your content actually goes live, on schedule, every week. Try it free with 2 custom posts delivered in 48 hours.
Frequently Asked Questions
What's the minimum tool budget needed to publish 2–3 posts per week?
You can run a functional blog engine stack for under $100/month using free or low-cost alternatives. Google Sheets for planning, Google Docs for production, Ubersuggest or Keywords Everywhere for basic keyword research, and a free WordPress SEO plugin cover the essentials. Paid tools like Ahrefs or Surfer SEO accelerate the process but aren't required to start. Focus on cadence first, then upgrade tools as bottlenecks emerge.
How do I maintain internal link quality as my blog grows?
Create a simple linking map in a spreadsheet listing your 10–20 highest-priority pages—typically service pages and cornerstone content. Update it monthly as new posts publish. During optimization, reference this map to ensure every new post links to relevant priority pages with descriptive anchor text. Link Whisper can automate suggestions at scale, but manual tracking works well for sites with fewer than 100 posts.
Which schema types matter most for blog posts?
Article schema is essential for every post—it helps search engines understand authorship and publication dates. FAQ schema should be added whenever your post includes a FAQ section, as it can generate rich results in search. HowTo schema applies to procedural or tutorial content. Most modern SEO plugins generate these automatically when you structure content correctly with proper headings.
How long before consistent publishing shows results in organic traffic?
Most sites see measurable traffic improvements within three to six months of consistent publishing, though this varies significantly by competition level and existing domain authority. The compounding effect accelerates over time—months six through twelve typically show stronger growth than months one through six, assuming content quality and optimization remain consistent throughout.
Should I use AI for writing or just for research?
AI works well for accelerating first drafts, generating outlines, and overcoming blank-page paralysis. However, AI-generated content still requires human editing for accuracy, brand voice, and genuine insight. The most effective approach treats AI as a drafting assistant rather than a replacement for editorial judgment. Final content should always pass through human review for fact-checking and voice calibration before publishing.
About The Mighty Quill
The Mighty Quill is an AI-powered blog engine built for growth-focused businesses that need consistent, SEO-optimized content without the overhead of managing writers or agencies. Founded by Mario, a digital marketing veteran with over 15 years of experience in e-commerce SEO and content strategy, The Mighty Quill combines AI efficiency with human editorial oversight to deliver 2–3 publication-ready articles per week. Our clients include SaaS companies, e-commerce brands, and marketing agencies seeking compounding organic growth through disciplined content operations.
Cited Works
[1] Content Marketing Institute — "B2B Content Marketing: Benchmarks, Budgets, and Trends."
https://contentmarketinginstitute.com/research/b2b-content-marketing-research/
[2] Nielsen Norman Group — "AI as a Writing Aid: Emerging Best Practices." https://www.nngroup.com/articles/ai-writing-tools/
[3] Moz — "Internal Linking for SEO: Why and How."
https://moz.com/learn/seo/internal-link
[4] Google Search Central — "Rich Results Test Tool."
https://search.google.com/test/rich-results